|
|
What is a DNS server and why would someone use it in a home network?
DNS stands for Domain Name Server. It is a server capable of translating the name of a computer or a WEB site (the URL) with its corresponding numeric IP address, which is the equivalent of the phone number of a person or a business office.
Continuing with the same analogy, The Domain Name is kind of the last name of a person identifying the whole family members, or the name of a company identifying all the locations of the company itself. Within that family or company, it is possible to address one specific person or site. In other words, the DNS is like a phone book, a directory that holds the IP addresses of several computers in the network.
In this analogy, the people are the computers and the companies are the networks were the computers are located.
Now, there are two main types of DNS servers: authoritative and caching. The authoritative servers are sometimes also known as primary and secondary servers, or master and slave servers, depending on the context and the way they are actually configured.
Authoritative servers are those that hold the addresses of a whole network domain, like dazzlingsolutions.com.
Caching servers are those that do not know about any address, but know about where to find them. When a caching server is interrogated, it launches a query to the authoritative server that it thinks has the answer, gets the information from there, and replies to the interrogation. In addition to that, it also stores the same information locally, for a certain amount of time, so that, if the same request comes in later on, it can find it in its own memory (the cache) and does not need to query the authoritative server. Once the time expires, the information is removed from the cache, and needs to be acquired again when it is needed. This guarantees that the address is periodically refreshed, in case it changes.
In addition to that, sometimes DNS servers can work simultaneously as authoritative for certain domains and as caching for others.
If you followed me so far, you may have already realized that we use DNS servers all the time, for example when we access a WEB site with a browser. Whenever we type the URL of a web site and hit ENTER, the browser contacts a DNS server to retrieve the actual numerical IP address of the site. Once the IP address is retrieved, the WEB browser can use it to send a WEB page request to the WEB site itself (well, actually to the WEB server powering that WEB site).
Normally, we use the DNS server of our own service provider, which is usually configured in the modem/router we use to connect to the internet. However, it is possible to modify the configuration of the modem/router and change the IP address of the service provider DNS server with another one, even our own.
OK, but why use our own DNS server in a home network? Well, two reasons:
- Having a local caching DNS server usually speeds up a little bit the queries to retrieve the IP addresses. You may benefit from a caching DNS server when you browse the WEB, because it becomes a little faster to retrieve from the cache the IP addresses of the WEB sites you visit (when available) rather than from the service provider DNS server which is located far away from your place.
- Some people (I am one of those) have a local network at home with a number of computers/servers. Maybe a file server to store pictures and movies, a network printer, a smart TV, or one of those consoles that allow TVs to connect to the internet, and so forth. Possibly, you may want to give names to all these network elements, and you want to address them by name rather than by their IP addresses. In that case, instead of letting your home router assign randomly chosen IP addresses (using a type of service named DHCP), you want to assign fixed IP addresses to each element and use a DNS server to translate the names in the corresponding IP addresses. It is much simpler to recall names than a bunch of numbers.
Are you intrigued with these possibilities? If so, don’t forget to read my next article, where I will explain how to create a DNS server in the home network using a Raspberry Pi as a server. If you have not done so already, go ahead and read my previous posts on the subject. Then, order an RPi and configure it as described. That will be the base for building the DNS server as I will illustrate next time.
Let’s dig right away into the procedure for installing Raspbian on the RPi. I will go very quickly on the general details, as they are very well explained in several other sites. In order to execute the procedure, you will need another computer that you will be using to prepare the SD card and to pre-partition the hard drive you will be using with the RPi.
If you never installed Raspbian before, I suggest you to search for the procedure on the internet, and try to do it at least once, before attempting to do what I am about to describe. A relatively good familiarity with the tool gparted would also be nice. The tool is usually available on any Linux distribution. If you don’t find it, just use you favorite package installer to put in on your system. Gparted is also available under Windows.
Here is what you’ll need:
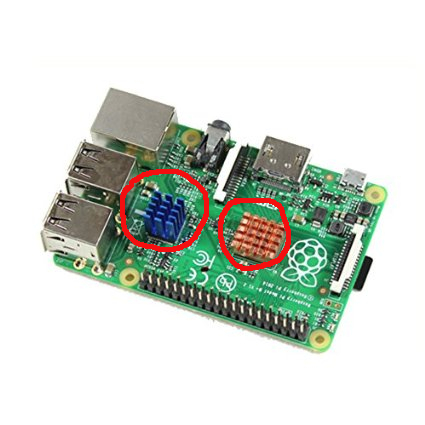
- A Raspbery Pi 2 version B. I strongly suggest to use this RPi, or a newer and more powerful version, if it becomes available when you read this article. You may want to also add a couple of heat sinks, if you plan to keep the RPi server running 24/7. They can be found easily on the internet. Here is a picture of the RPi 2B with heat sinks:
- A power supply for the RPi. Any cell phone charger with micro USB will work, as long as it provides an output current of at least 1.5 A.
- An external USB portable hard disk drive. I used a 1 Tb Passport from Western Digital, but any other similar device will work. You can even use an internal hard disk, provided that you buy one of those adapters to go from SATA or PATA to USB. The RPi has a USB 2.0 interface. However, if your HD has USB 3.0, it will still work, although you won’t be able to use the full speed of that interface.
- A power supply for the hard disk drive. Do not think to power the HD from the USB port itself, it will not work, because the RPi ports do not provide enough juice to power the HD. In my case, I connected my Passport to the RPi through one of those powered USB hubs. As a bonus, I got a few extra USB ports available on the Pi, in case I need them for future applications.
- A computer you can use to prepare the MicroSD card and to partition and format the hard disk drive. I am a Linux guy, so I used my main Linux computer, which runs the Fedora distro. But also Windows works fine, although you’ll have to go through a few more steps to install the tools you need to write on the MicroSD card and to partition the HD.
Once you have everything ready, you can start the installation procedure as follows.
- Copy on the MicroSD card the latest version of NOOBS.
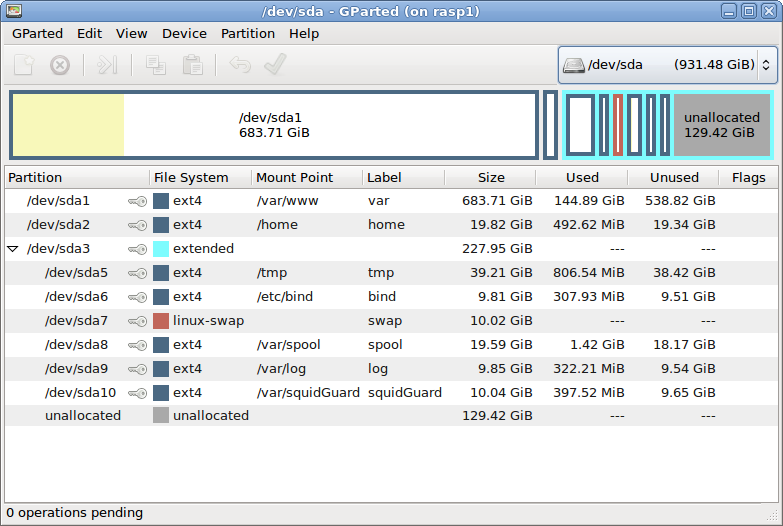
- Connect the HD to your PC, run gparted (or whatever partitioning tool you are comfortable with), and partition the disk as in the following picture. You can adjust the size of each partition according to your needs. In my case, I even left some unallocated space for future use. Note that all the partitions created on this HD are meant to replace partitions available on the MicroSD card. The reason for the replacement is a matter of both size and reliability. The SD card does not have enough space for the needs of a server. Also, those partitions where the system writes very often will quickly make the SD card inoperable, if we keep using them over and over (see my previous article to know why). Replacing those partitions, with the ones on the HD, will greatly extend the lifetime of the RPi server.
 Execute the procedure to install Raspbian on the RPi using the NOOBS menu. You will have to connect the RPi to the TV and to a keyboard and mouse to do so. It is also useful to connect the Pi to the network. This will allow for installing the most recent updates to the Raspbian distribution. Execute the procedure to install Raspbian on the RPi using the NOOBS menu. You will have to connect the RPi to the TV and to a keyboard and mouse to do so. It is also useful to connect the Pi to the network. This will allow for installing the most recent updates to the Raspbian distribution.- Toward the end of the installation, the raspi-config utility will be launched. Use it to do the following:
- Make sure that the file system is already expanded to the max size of the SD card.
- Adjust the memory split giving the GPU only 16Mb. Since you will use the RPi as a server, you will mainly work on it through the command line to install and configure the server itself. You will not use the graphical interface, therefore you don’t need much memory assigned to the GPU.
- Enable ssh, so you will be able to connect remotely to the RPi from another PC in the network.
- Change the host name to something more meaningful to you. In my case, since I planned to have a number of RPi in my home network, I named this one ‘rasp1’.
- Shutdown the Raspberry Pi and power it down.
- Connect the HD to one of the 4 USB ports of the RPi, attach the network cable and power up the disk, wait a 10-15 seconds, then power up the RPi. This is to make sure that when the RPi completes the initialization, the disk is already spinning and available, otherwise it could not be recognized.
- Figure out the IP address currently assigned to the Raspberry Pi by your router. This could be done logging into the router and look for the newest device assigned IP address. Another way would be to scan the IP addresses of your network from a PC, until you find the one you are looking for.
- Now, if you have a Linux PC, just fire up a terminal window and ssh to the RPi as follows:
ssh -X pi@<ip_address_of _the_PI>
then enter the password raspberry.
- Activate the X forwarding on the PI:
- sudo vi /etc/ssh/sshd_config
- add the following line to the end of the file:
X11Forwarding yes
- save and close the file
- restart the ssh deamon:
sudo service ssh restart
- Set the time zone:
sudo dpkg-reconfigure tzdata
and follow the appropriate prompts.
- It is now time to make the changes for automounting the partitions of the external disk:
- execute the command
sudo blkid
and take a note of the following information for each partition of the external disk. The external disk partitions will most probably be identified by names like /dev/sda1, /dev/sda2, and so forth. Here is an example of the command output: 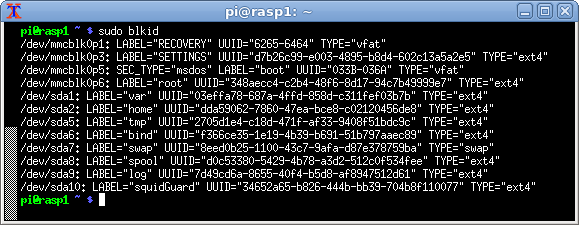
- Before mounting the /home partition, we need to save the current contents of /home/pi in some other place so, after mounting the /home partition, we can restore the pi directory in it:
sudo cp -rp /home/pi /var/.
- Edit file /etc/fstab (using sudo) and add one line for each of the partitions that we want to automount the next time the system is started at the following mountpoints: /var/www, /home, /tmp, /etc/bind. Each line needs to follow the following syntax (substitute the appropriate values for <UUID>, <mount_point>, and <TYPE>:
UUID=<UUID> <mount_point> <TYPE> defaults,nofail 0 2
Here is how they look like in my case:
- Create the following mount points (the others are there already):
- sudo mkdir /var/www ; sudo chmod 755 /var/www
- sudo mkdir /etc/bind ; sudo chmod 755 /etc/bind
- Reboot the PI:
sudo reboot
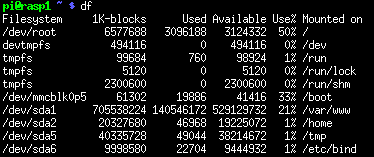
- Once the PI comes back, make sure all the four partitions are mounted, using the command df:
- Now restore the saved contents of the ‘pi’ directory:
cp -rp /var/pi /home/.
- Since I am a Fedora person, I like to have access to the root login, so I can run long sequences of commands without the need to use sudo in front of each one of them. This is your preference, everything will work just fine even if you don’t do it. However, from now on, I will assume I am working from the root login when making changes to the system, so I will omit the prefix sudo in all the commands. If you don’t use the root login, don’t forget to use sudo. In order to add root login, just run the command
sudo passwd
and follow the prompts. Once that is done, you can login to the RPi as root, with the password you provided to the above command.
- Update the Raspbian software, to make sure you are running the latest version of the software:
- apt-get update
- apt-get upgrade
- Since we are going to use the Raspberry Pi as a server for the home network, it is better if we give to it a static IP address, rather than having it assigned dynamically by the DHCP server on the router (or any other DHCP server you may have in your network). In the process, also add a few alias IP addresses, so we can have different IP addresses for different servers running on the same system. To do so, edit the file /etc/network/interfaces and modify it as in the following picture (use your IP addresses instead). Make sure the IP addresses you choose are not in the range of the dynamically assignable IP addresses of your DHCP server (i.e. the router)

- Reboot the system one more time.
- Create and put in use a swap partition from the external HD:
- use gparted to verify the name of the device to which the swap partition was assigned. In my case /dev/sda7
- mkswap /dev/sda7
- swapon /dev/sda7
- add the following line to /etc/fstab:
UUID=<swap_partition_uuid> none swap sw 0 0
- Reboot the RPi one last time.
This concludes the setup of the Raspberry Pi to make it work as a server. Next time we will start configuring the actual server applications on it. We will begin with a DNS server, then we will continue by adding a Proxy server, then a WEB server, a SAMBA server and, finally, a DLNA server. All of them can run simultaneously on the RPi 2B keeping the performance at an acceptable level for a home application.
One of the neat features of the Raspberry Pi is that the whole operating system and applications run out of a Micro SD card. This allows to quickly switch from one setup to another by simply swap the card.
However, this feature is also its greatest weakness when the RPi is used as an always on server, because a Micro SD card can be written at the same location only a limited amount of times.
SD cards employ an internal algorithm (wear levelling) to use different memory blocks at different times at every write, even if the memory address is the same. This helps in distributing the writing operations across the whole memory chip, and the greater is the capacity of the memory, the longer is the lifetime of the chip. (If you are interested in more details, here is a technical white paper from Sandisk, and here is a high level description of the most used algorithms).
In the case of the Raspberry Pi, the whole Micro SD card is used to store the Linux distribution with all its components. It is also used to store data, like you usually do with any computer. So, as long as you experiment with the RPi and use the system every now and then, the Micro SD card lifetime is not a big issue. However, if you use the RPi as an always on server, the memory storage gets used much more often, and its life expectancy decreases greatly. I read of several people reporting their RPi was behaving erratically, or even stop working at all, after a few weeks that they were using it constantly.
Since in my case I had to build a server for the home network, and I wanted it to be reliable and durable, I obviously had to solve that problem.
My server, in fact, is supposed to stay up all the time, to satisfy any need 24/7.
The way I approached the solution for the problem was to use an external USB drive in combination with the Micro SD card. I left the partitions containing data that rarely change on the memory card, along with the boot partition, and moved all the partitions holding data that I expected to change frequently on an external USB hard disk.
Next time, I will show you the procedure to install the Raspbian distribution on a RPi 2B using a mix of the Micro SD card and a hard disk connected through one of the available 4 USB ports. I will describe more extensively only those steps of the procedure that differ from a regular Raspbian installation done through the NOOB image. If you need more details on the basic parts of the installation, please refer to the Raspberry Pi web site, which provides plenty of information.
|
DZgameEngine Repository
on GitHub
|
|